Five questions decide whether a chamber returns to production in one shift or in two weeks. Which failure mode triggered the call? Which grade of replacement is defensible for this tool? What must the incoming inspection prove? What has to be measured after the first pump-down? Who signs off on the first production wafer? An ESC electrostatic chuck replacement is a chain, and Hitron sees it break most often at the second question, where cost pressure pushes a fab toward a grade the application cannot carry.
Read the Failure Before You Open the Chamber
The call arrives as one sentence: the chuck is not clamping. By the time a technician reaches the tool, the evidence that identifies the real failure mode has already started to decay, so capture it first. Recipe, chamber, wafer count since the last clean, backside helium flow history, and any recent event on the RF or chiller side. Screenshot the trends before you vent.
The order matters. Trends are lost once the chamber is vented and the controller is reset, and the removed unit is the only witness left. Write the failure description in the work order using the operator's words before translating it into a fault code, because the wording usually carries the clue. A wafer that slid is not the same event as a wafer that never clamped.
Four Failure Modes and What Each Leaves Behind
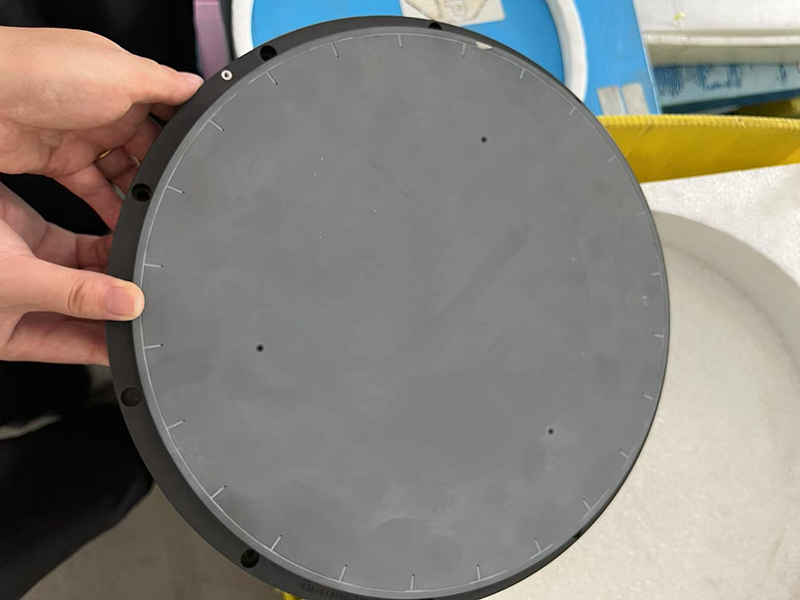
Clamping force decay, thermal drift, backside particle generation, and arc marks account for most
ESC electrostatic chuck replacements. They look similar in the fault log and completely different on the surface of a removed part. That is why the removed unit is the most valuable piece of evidence in the whole job, and why it should never go straight into a bag before someone photographs the clamping face.
|
Failure mode |
Evidence in the data |
Surface evidence after removal |
Verdict |
|
Clamping force decay |
Wafer shift, unstable backside flow, clamping current drift |
Gloss loss or lap marks on the dielectric face |
Replace |
|
Thermal drift |
Temperature offset grows with RF power |
Local discoloration, coating wear at the hot zone |
Replace once the chiller is cleared |
|
Backside particles |
Particle excursion on the first wafers |
Particle trails, seal residue on the backside ring |
Replace and check the gas path |
|
Arc marks |
Reflected power spikes, chamber trips |
Pitting or tree marks near the gas feed |
Replace and inspect the electrode |
Separating Chuck Fault from Chiller Fault
Some chucks pulled for poor clamping are innocent. A drifting chiller setpoint, a partly blocked backside helium path, or a shifted RF match can imitate every symptom of a worn dielectric. Check the chiller and the helium supply against their own logs before condemning the ESC electrostatic chuck. If backside flow holds and the temperature still wanders, the chuck is a candidate. If flow is unstable, fix the gas path first.
Pull the wafer count since the last wet clean as well. A unit that has run well past its normal service interval and a unit that failed early in the interval are two different problems, and the second one often turns out to be a process excursion rather than the part.
Deciding Between OEM NEW, 2nd NEW, and Refurbished
Grade selection is where engineering meets budget, and where a cheap decision turns into a second downtime event a few months later.
What Each Grade Actually Means in Practice
OEM NEW usually means a unit built to the original specification with no prior service history. 2nd NEW usually means an unused unit built to the same drawing outside the original supply chain, and the open question is whether the drawing was followed. Refurbished usually means a used unit that has been stripped, cleaned, re-coated or re-lapped where needed, and retested. The three grades differ less in appearance than in the documentation that follows them out the door.
Cost, Risk, and Downtime Trade-offs
The cheapest grade is not the one with the lowest invoice. A refurbished
ESC electrostatic chuck on a mature etch process with a long qualification history is often the right call. The same unit on a process running close to the dielectric limit is a scheduled failure. Match the grade to how much process window the application still has, not to the purchase order value.
Grade decisions also carry a schedule cost that never appears on the invoice. A unit that needs requalification pushes every lot behind it, and the queue does not care whether the saving was real. Where the process window is wide, a refurbished unit buys spares coverage that a new unit cannot justify inside the same budget.
|
Grade |
What it is |
Best fit |
Verify before purchase |
|
OEM NEW |
Built to the original drawing, no service history |
Processes near the dielectric limit, qualification-sensitive tools |
Grade stated on the quotation |
|
2nd NEW |
Unused second-source unit built to the same drawing |
Mature processes with stable recipes |
Source, drawing revision, incoming test result |
|
Refurbished |
Used unit stripped, cleaned, re-coated or re-lapped, retested |
Non-critical chambers, spares coverage, older 200 mm tools |
What was replaced, retest data, warranty terms |
Hitron supplies all three grades and will state which one a quotation covers. A vendor that answers "like new" without naming the grade is telling you something about the paperwork, not the part.
Incoming Inspection at the Dock
Inspection exists to catch the unit that left the supplier wrong, before it costs a pump-down. Do it at the dock, not at the tool. Ask Hitron for the grade confirmation and the test record before the unit ships, since both cost nothing up front.
Dimensional and Visual Checks
Measure the critical interfaces against the drawing: overall height, mounting hole pattern, gas feed position, and the flatness of the clamping face. Under oblique light, look for coating holidays, lap marks, edge chips, and any discoloration that suggests a repaired surface. Photograph the face before it goes into the chamber. That photo becomes the baseline for the next teardown.
Electrical and Thermal Checks
Verify electrode continuity and insulation resistance against the supplier drawing, and confirm the polarity arrangement matches the tool. Check the heater circuit if the ESC electrostatic chuck carries one, and confirm the temperature sensor reads ambient correctly before installation. A sensor that is off at room temperature will be further off under load.
Insulation resistance deserves its own moment. A reading that passes at low voltage and collapses at the rated test voltage points at a dielectric layer that is already compromised, and that unit will arc in service instead of failing quietly at the dock.
|
Inspection item |
Method |
Accept basis |
|
Overall height |
Micrometer or height gauge |
Supplier drawing |
|
Mounting hole pattern |
Pin gauge or CMM |
Supplier drawing |
|
Clamping face flatness |
Straight edge with indicator |
Supplier drawing |
|
Surface condition |
Oblique light under magnification |
No coating holiday, chip, or lap mark |
|
Electrode continuity |
Multimeter across terminals |
Supplier drawing |
|
Insulation resistance |
Megohmmeter at rated voltage |
Supplier drawing |
|
Heater circuit |
Resistance and insulation test |
Supplier drawing |
|
Temperature sensor |
Ambient reading against a reference |
Tool tolerance |
Rejections at this stage are cheap. A flatness deviation found at the dock costs a return shipment. The same deviation found after pump-down costs a vent, a requalification, and a production lot in the queue behind it.
Installation and First Wafer
Installation errors produce the same symptoms as a bad chuck, so the sequence matters as much as the torque values.
Torque, Helium Leak, and Backside Flow Checks
Follow the supplier sequence rather than general habit:
1. Clean the mounting surface and confirm nothing sits under the chuck.
2. Lower the unit with a soft sling, never by the gas fitting.
3. Torque in the drawing's cross pattern, in two passes.
4. Leak-check the backside helium circuit at the specified pressure.
5. Confirm backside flow across the full wafer map.
6. Record ambient temperature and sensor reading before pump-down.
Two details cause most repeat work. Debris trapped under the chuck shows up as a local hot spot that reads like a chuck defect. Over-torque distorts the mounting face and destroys the flatness measured at the dock.
Clamping Force and Temperature Verification
Industry-typical clamping voltages sit between ±600 V and ±1500 V, with holding force above 50 g/cm², and the tool specification governs what you actually see. Confirm the ESC electrostatic chuck reaches its clamping state at the commanded voltage, that the wafer does not shift under a test push, and that the temperature controller settles inside the process window. Watch settle time as closely as the final value, because a slow settle is an early sign of a marginal thermal interface.
The First Three Wafers
Run qualification wafers on a known-good recipe and compare them against the pre-failure baseline. Particle count, backside temperature uniformity, and any measurable shift in the process result belong on the sign-off sheet. Hold the lot until those numbers agree with history. Signing off on a single wafer hides the drift that appears at wafer two.
Keep the pre-failure baseline where the next shift can find it. Most arguments over whether a replacement degraded performance are arguments about a number nobody wrote down.
Building a Spare Strategy That Survives Two Tools Down
One spare on the shelf covers one failure. Two failures in the same week expose whether the strategy was a shelf or a supply chain.
Coverage Across LAM, AMAT, Hitachi, TEL, and Novellus
Hitron stocks and supplies ESC electrostatic chuck units across the platforms that dominate installed 200 mm and 300 mm capacity, which shortens the interval between a confirmed failure and a working replacement on site.
|
Platform |
Covered tool families |
|
LAM |
2300 Flex, Exelan, Kiyo FX, Kiyo EX, Kiyo CX, Kiyo 45, KiyoFX Hydra, Syndion C and FS, Versys Kiyo, Flex |
|
AMAT |
Ultima 8-inch and 12-inch, Mesa G5 G3.9 Minos, Mesa C3 SYM3 black hawk |
|
Hitachi |
8-inch and 12-inch ESC, 12-inch ESC Sebit2 |
|
TEL |
72167NP-80911, 06037NP-159V7, 01298NP-80911 |
|
NOVELLUS |
Polyimide ESC, 200 mm ESC |
|
Materials |
AlN heater, SiC, polyimide, ceramic, thermal sprayed 150 mm, Y₂O₃ coating |
Coverage on paper is worth little without a stocking decision behind it. A fab running two Kiyo FX chambers and one older Novellus platform needs a different spare mix than a line of matched tools, and the mix should be reviewed whenever the tool set changes.
Warranty, Traceability, and Contact
Every unit ships with three months of warranty from the shipment date, along with the paperwork that lets a fab trace what it installed. Ask for the grade in writing on the quotation, not over the phone. Wuxi Hitron Semiconductor Co., Ltd. holds localized spare parts inventory at its Jiangsu site, and the team answers technical questions directly at +86 18101522032 or Jerry@hitronsemi.com.
Traceability matters more than it looks on a purchase order. When two identical tools behave differently after a change, the record of which grade went into which chamber is the only way to explain it without pulling both.